Homedoc
Cart 0
  • Home
  • Products
    • Fertility & Pregnancy
      • Ovulation Test
      • Pregnancy Tests – Strip
      • Pregnancy Tests – Midstream
      • Pregnancy Tests – Digital
      • Combo Kits
      • Male Fertility
      • Basal Thermometer
    • Urine & General Health Test Strips
      • Urinalysis / General Health
      • UTI / Vaginal Health (Urine-Based)
      • Drug Tests
      • Alcohol Tests
    • Blood & Metabolic Testing
      • Blood Test Devices & Meters
      • Vitamin & Mineral Deficiency
      • Other Metabolic / Organ Function
    • Women's Health
      • Menopause Test
      • Vaginal & Hormonal Health
    • Infectious Disease & Immune Health
      • Respiratory / Viral
      • Immune Disorders / Autoimmune
      • Micronutrient & Hormone
      • Infectious Disease
    • Home Health Devices
      • Monitoring Devices
      • Respiratory / Baby Care
      • Home Care Tools
    • Pain Relief & Therapy
      • TENS & EMS Units
  • Blog
  • FAQs
  • About us
Afghanistan (ZAR R)
Åland Islands (ZAR R)
Albania (ZAR R)
Algeria (ZAR R)
Andorra (ZAR R)
Angola (ZAR R)
Anguilla (ZAR R)
Antigua & Barbuda (ZAR R)
Argentina (ZAR R)
Armenia (ZAR R)
Aruba (ZAR R)
Ascension Island (ZAR R)
Australia (ZAR R)
Austria (ZAR R)
Azerbaijan (ZAR R)
Bahamas (ZAR R)
Bahrain (ZAR R)
Bangladesh (ZAR R)
Barbados (ZAR R)
Belarus (ZAR R)
Belgium (ZAR R)
Belize (ZAR R)
Benin (ZAR R)
Bermuda (ZAR R)
Bhutan (ZAR R)
Bolivia (ZAR R)
Bosnia & Herzegovina (ZAR R)
Botswana (ZAR R)
Brazil (ZAR R)
British Indian Ocean Territory (ZAR R)
British Virgin Islands (ZAR R)
Brunei (ZAR R)
Bulgaria (ZAR R)
Burkina Faso (ZAR R)
Burundi (ZAR R)
Cambodia (ZAR R)
Cameroon (ZAR R)
Canada (ZAR R)
Cape Verde (ZAR R)
Caribbean Netherlands (ZAR R)
Cayman Islands (ZAR R)
Central African Republic (ZAR R)
Chad (ZAR R)
Chile (ZAR R)
China (ZAR R)
Christmas Island (ZAR R)
Cocos (Keeling) Islands (ZAR R)
Colombia (ZAR R)
Comoros (ZAR R)
Congo - Brazzaville (ZAR R)
Congo - Kinshasa (ZAR R)
Cook Islands (ZAR R)
Costa Rica (ZAR R)
Côte d’Ivoire (ZAR R)
Croatia (ZAR R)
Curaçao (ZAR R)
Cyprus (ZAR R)
Czechia (ZAR R)
Denmark (ZAR R)
Djibouti (ZAR R)
Dominica (ZAR R)
Dominican Republic (ZAR R)
Ecuador (ZAR R)
Egypt (ZAR R)
El Salvador (ZAR R)
Equatorial Guinea (ZAR R)
Eritrea (ZAR R)
Estonia (ZAR R)
Eswatini (ZAR R)
Ethiopia (ZAR R)
Falkland Islands (ZAR R)
Faroe Islands (ZAR R)
Fiji (ZAR R)
Finland (ZAR R)
France (ZAR R)
French Guiana (ZAR R)
French Polynesia (ZAR R)
French Southern Territories (ZAR R)
Gabon (ZAR R)
Gambia (ZAR R)
Georgia (ZAR R)
Germany (ZAR R)
Ghana (ZAR R)
Gibraltar (ZAR R)
Greece (ZAR R)
Greenland (ZAR R)
Grenada (ZAR R)
Guadeloupe (ZAR R)
Guatemala (ZAR R)
Guernsey (ZAR R)
Guinea (ZAR R)
Guinea-Bissau (ZAR R)
Guyana (ZAR R)
Haiti (ZAR R)
Honduras (ZAR R)
Hong Kong SAR (ZAR R)
Hungary (ZAR R)
Iceland (ZAR R)
India (ZAR R)
Indonesia (ZAR R)
Iraq (ZAR R)
Ireland (ZAR R)
Isle of Man (ZAR R)
Israel (ZAR R)
Italy (ZAR R)
Jamaica (ZAR R)
Japan (ZAR R)
Jersey (ZAR R)
Jordan (ZAR R)
Kazakhstan (ZAR R)
Kenya (ZAR R)
Kiribati (ZAR R)
Kosovo (ZAR R)
Kuwait (ZAR R)
Kyrgyzstan (ZAR R)
Laos (ZAR R)
Latvia (ZAR R)
Lebanon (ZAR R)
Lesotho (ZAR R)
Liberia (ZAR R)
Libya (ZAR R)
Liechtenstein (ZAR R)
Lithuania (ZAR R)
Luxembourg (ZAR R)
Macao SAR (ZAR R)
Madagascar (ZAR R)
Malawi (ZAR R)
Malaysia (ZAR R)
Maldives (ZAR R)
Mali (ZAR R)
Malta (ZAR R)
Martinique (ZAR R)
Mauritania (ZAR R)
Mauritius (ZAR R)
Mayotte (ZAR R)
Mexico (ZAR R)
Moldova (ZAR R)
Monaco (ZAR R)
Mongolia (ZAR R)
Montenegro (ZAR R)
Montserrat (ZAR R)
Morocco (ZAR R)
Mozambique (ZAR R)
Myanmar (Burma) (ZAR R)
Namibia (ZAR R)
Nauru (ZAR R)
Nepal (ZAR R)
Netherlands (ZAR R)
New Caledonia (ZAR R)
New Zealand (ZAR R)
Nicaragua (ZAR R)
Niger (ZAR R)
Nigeria (ZAR R)
Niue (ZAR R)
Norfolk Island (ZAR R)
North Macedonia (ZAR R)
Norway (ZAR R)
Oman (ZAR R)
Pakistan (ZAR R)
Palestinian Territories (ZAR R)
Panama (ZAR R)
Papua New Guinea (ZAR R)
Paraguay (ZAR R)
Peru (ZAR R)
Philippines (ZAR R)
Pitcairn Islands (ZAR R)
Poland (ZAR R)
Portugal (ZAR R)
Qatar (ZAR R)
Réunion (ZAR R)
Romania (ZAR R)
Russia (ZAR R)
Rwanda (ZAR R)
Samoa (ZAR R)
San Marino (ZAR R)
São Tomé & Príncipe (ZAR R)
Saudi Arabia (ZAR R)
Senegal (ZAR R)
Serbia (ZAR R)
Seychelles (ZAR R)
Sierra Leone (ZAR R)
Singapore (ZAR R)
Sint Maarten (ZAR R)
Slovakia (ZAR R)
Slovenia (ZAR R)
Solomon Islands (ZAR R)
Somalia (ZAR R)
South Africa (ZAR R)
South Georgia & South Sandwich Islands (ZAR R)
South Korea (ZAR R)
South Sudan (ZAR R)
Spain (ZAR R)
Sri Lanka (ZAR R)
St. Barthélemy (ZAR R)
St. Helena (ZAR R)
St. Kitts & Nevis (ZAR R)
St. Lucia (ZAR R)
St. Martin (ZAR R)
St. Pierre & Miquelon (ZAR R)
St. Vincent & Grenadines (ZAR R)
Sudan (ZAR R)
Suriname (ZAR R)
Svalbard & Jan Mayen (ZAR R)
Sweden (ZAR R)
Switzerland (ZAR R)
Taiwan (ZAR R)
Tajikistan (ZAR R)
Tanzania (ZAR R)
Thailand (ZAR R)
Timor-Leste (ZAR R)
Togo (ZAR R)
Tokelau (ZAR R)
Tonga (ZAR R)
Trinidad & Tobago (ZAR R)
Tristan da Cunha (ZAR R)
Tunisia (ZAR R)
Türkiye (ZAR R)
Turkmenistan (ZAR R)
Turks & Caicos Islands (ZAR R)
Tuvalu (ZAR R)
U.S. Outlying Islands (ZAR R)
Uganda (ZAR R)
Ukraine (ZAR R)
United Arab Emirates (ZAR R)
United Kingdom (ZAR R)
United States (ZAR R)
Uruguay (ZAR R)
Uzbekistan (ZAR R)
Vanuatu (ZAR R)
Vatican City (ZAR R)
Venezuela (ZAR R)
Vietnam (ZAR R)
Wallis & Futuna (ZAR R)
Western Sahara (ZAR R)
Yemen (ZAR R)
Zambia (ZAR R)
Zimbabwe (ZAR R)
English
Homedoc
  • Home
  • Products
    • Fertility & Pregnancy
      • Ovulation Test
      • Pregnancy Tests – Strip
      • Pregnancy Tests – Midstream
      • Pregnancy Tests – Digital
      • Combo Kits
      • Male Fertility
      • Basal Thermometer
    • Urine & General Health Test Strips
      • Urinalysis / General Health
      • UTI / Vaginal Health (Urine-Based)
      • Drug Tests
      • Alcohol Tests
    • Blood & Metabolic Testing
      • Blood Test Devices & Meters
      • Vitamin & Mineral Deficiency
      • Other Metabolic / Organ Function
    • Women's Health
      • Menopause Test
      • Vaginal & Hormonal Health
    • Infectious Disease & Immune Health
      • Respiratory / Viral
      • Immune Disorders / Autoimmune
      • Micronutrient & Hormone
      • Infectious Disease
    • Home Health Devices
      • Monitoring Devices
      • Respiratory / Baby Care
      • Home Care Tools
    • Pain Relief & Therapy
      • TENS & EMS Units
  • Blog
  • FAQs
  • About us
Wishlist Cart 0

Search our store

Homedoc
Wishlist Cart 0
Female Fertility

How to Compare Your Fertility Charting to a Typical Ovulation Chart

by Imaan O'Leary-Rossier on Oct 18, 2022
How to Compare Your Fertility Charting to a Typical Ovulation Chart

Schedule a consultation with Dr. Haebe right through your Premom app! 

If you’ve read our blog on getting pregnant fast, then you understand how important tracking your LH levels can be when trying to conceive. However, there can be a great deal of variances in LH patterns. Some are not problematic, but other LH patterns can indicate an issue -- or at least an obstacle -- to conception.

The two normal patterns of LH surges are gradual onset LH peak and rapid onset LH peak. The primary difference between the two is that a gradual LH surge will slowly rise over 1-6 days of your cycle, where a rapid surge pattern will quickly rise in just one day!

When women were studied, it was found that 57.1% had a gradual onset greater than one day, and 42.9% of women had the rapid onset.  Let’s take a look at a few charts and see how this affects testing and conception.

Rapid Surge

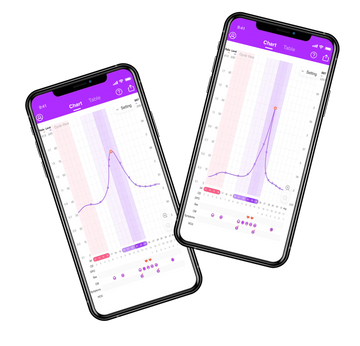
When we take a look at the chart below, we can see several days of LH (luteinizing hormone) testing without much rise and fall. However,  on CD (cycle day) 13 there was an enormous spike in LH levels!


Ideally a person with this surge type would track LH levels every day during the predicted fertile window, and potentially sooner. For those with a rapid onset LH surge, a missed day could mean a missed peak. If they're not careful, they may not know ovulation occurred, until a BBT rise afterward confirms it.  If you yourself haven’t found an LH peak, it may be a good idea to test twice daily for 1-2 cycles to ensure that you are not missing a rapid rise!

As you can see, intercourse was timed appropriately for peak day and ovulation day on CD13 and 14.  Ideally sexual activity should be targeted throughout the fertile window (seen in purple on the graph). In this case that would include CD9 through CD15 (including the day after suspected ovulation on CD14).

This example does include some appropriately timed fertile CM. Unfortunately, there is no BBT (basal body temperature) tracking included, so it would be difficult to know if the LH peak truly resulted in successful ovulation.

Gradual Surge

A gradual LH surge seems to be the most commonly referenced cycle pattern. Let’s look at this sample gradual surge chart and examine the pros and cons.

To begin, there is great daily tracking to ensure the surge is not missed.. We can see that the LH levels do bob up and down at a low level for a few days, then gradually begin a steady increase CD 11-13. You’ll notice that CD 14,15, and 16 the LH levels have lowered again so there is confidence peak has been found.

Again, this example includes intercourse on ovulation day and the day before, but it would be better to have intercourse well before the LH peak, starting CD9. Having sperm present before peak day helps to ensure a higher likelihood of conception.

Additionally, an odd observation about this chart is that no fertile mucus was noted prior to LH peak.  If the fertile mucus was entirely absent, then there could be an issue with the follicular phase, even with an LH peak present. BBT and PdG tracking could confirm ovulation, as hCG tracking would confirm pregnancy.

What If My LH Surge Doesn’t Fit These Patterns?

If your LH surge doesn’t seem to fit either of the above patterns, it may look something like the example chart below.  Let’s take a look!

At first glance this chart may not look abnormal. However, upon further inspection we start to see some issues with LH.

We can see the LH was tested everyday to ensure peak was not missed. However, we can also see that there was not one significant LH peak day.  On CD 13 and CD15 we get little mini peaks, but nothing monumental. 

It would be a rare finding, but there is a slight chance that this user was very overhydrated on her peak days, and the LH sample was diluted so significantly that it made LH levels appear lower than they were. It’s a great reminder to keep your water intake consistent daily so that samples aren’t ultra concentrated one day and super diluted another day.

Adding in BBT tracking is always helpful in these cases, as we could refer to a spike in BBT for confirmation of ovulation. Although there is no perfect LH level to trigger ovulation, the pattern of this chart indicates an unlikelihood of sufficient LH activity to trigger ovulation.

A great practice shown in this example is consistent testing! Even with minor peaks, the ovulation testing continued, to ensure that a late LH surge was not missed.  Sometimes it can get tiring testing for ovulation daily, with long and drawn out cycles, but it provides incredible information about how your body is operating -- so stay strong!

There’s likely a reason that your body isn’t hormonally cycling well -- or perhaps you could use some tips on how to ensure you are testing your LH, BBT and CM properly.  If your chart looks like this, it may be worth a conversation with one of our fertility specialists in a Premom virtual consultation. Check out your app to see all the provider types we offer.

Previous
5 Tips on How to Use Ovulation Tests
Next
Inability to Get Pregnant While Using Ovulation Tests, Basal Body Temperature (BBT), and Progesterone Testing: What to Investigate Next!

Related Articles

"What's for Dinner?" Pregnancy Do’s and Don’ts for a Healthy Baby

"What's for Dinner?" Pregnancy Do’s and Don’ts for a Healthy Baby

TTC Postpartum and Breastfeeding

TTC Postpartum and Breastfeeding

Your Period: What’s Regular, What’s Irregular

Your Period: What’s Regular, What’s Irregular

What You Need to Know About Ovulation Dysfunction

What You Need to Know About Ovulation Dysfunction

Categories

  • Fertility
  • Keto Tests
  • Test kits
  • Test Strips
  • Pregnancy Test

Tags

  • am I ovulating
  • back pain
  • best time to get pregnant
  • conception
  • Easy@Home
  • Easy@Home 029G
  • Easy@Home tens
  • EHE018
  • female fertility
  • fertile window
  • fertility
  • fertility chart
  • fertility cycle
  • fertility hormones
  • fertility tracking
  • get pregnant
  • get pregnant fast
  • get pregnant naturally
  • getting pregnant
  • HEAT TENS
  • how to get pregnant
  • how to get pregnant fast
  • how to use ovulation tests
  • intercourse timing
  • joint pain
  • LH
  • LH Levels
  • LH Peak
  • menstrual cycles
  • muscle stimulation
  • neck pain
  • nerve pain
  • opk
  • ovulation
  • ovulation calculator
  • ovulation chart
  • ovulation cycle
  • ovulation predictor
  • ovulation predictor kit
  • ovulation symptoms
  • ovulation test
  • ovulation tests
  • ovulation tracker
  • ovulation tracking
  • pain relief
  • PCOS
  • peak
  • pregnancy
  • pregnant
  • Premom
  • Premom App
  • quantitative ovulation test strips
  • quantitative tests
  • ratio
  • t/c ratio
  • tc ratio
  • TENS
  • tracking ovulation
  • trying to conceive
  • when to take ovulation tests

Main menu

  • Home
  • Products
  • Blog
  • FAQs
  • About us

Quick Links

  • Search
  • Returns, Refunds, and Exchanges
  • Terms & Conditions
  • Privacy policy
  • Terms of Service
  • Refund policy

Smarter Health Starts Here

Join our mailing list for helpful wellness tips, exclusive offers, and product updates.

© 2024 | Design & Developed By Code Inc Solutions
Payment options:
    Cart 0

    Confirm your age

    Are you 18 years old or older?

    Come back when you're older

    Sorry, the content of this store can't be seen by a younger audience. Come back when you're older.

    This website uses cookies to ensure you get the best experience on our website. Learn more

    Shopping Cart

    Your cart is currently empty.
    Add note for seller
    Estimate shipping rates
    Add a discount code
    Pick a delivery date:
    null
    Subtotal R 0.00
    View Cart